We are trying to do this as cheaply as possible. So far, we have spent only $39 on supplies - mostly sand (the kids keep absconding with it - I think we need to build them a sandbox)
Alrighty - we began with a circular foundation, made from large pavers (obtained free from our neighbor). We only dug about 4 inches down into the ground since they ground rarely freezes here. In areas where freezing is more common, the foundation should be dug deeper down to provide more stability.
 The outside of our foundation. And, yes, that is our littlest one minus her clothing. I don't know what happens. When I bring her out, she is fully dressed. I turn around, and her clothing has disappeared.
 We filled the foundation with old broken concrete, rocks, and broken bricks. We had most of this lying around in our backyard.
We filled the foundation the rest of the way with small gravel (free from craigslist!). Then we put in several glass wine bottles (thanks Josie!) for insulation (helps the heat from escaping down into the foundation)

We filled the spaces inbetween the glass bottles with our insulation mix - clay slip (basically watered down clay) and perlite. We couldn't find a source of sawdust, and the book recommended perlite as a good second. We formed a ring with bricks (free from Julie - thanks!) to surround the oven mix (clay and sand) that would form the foundation for our hearth floor.

The hearth floor - the earth oven book recommends using fire brick. We were unable to locate a free or cheap source in our area - there aren't that many fireplaces in our part of Texas. The books says that unglazed saltillo tiles might work well, and my husband was able to get all 6 of these for less than $5 at a tile store. They don't butt up against each other as closely as we would like, but we are going to see if they work out for us.

Building the sand dome - I think this was everyone's favorite part. Who doesn't like playing with sand? We made ours 16 inches high - like the book recommends.

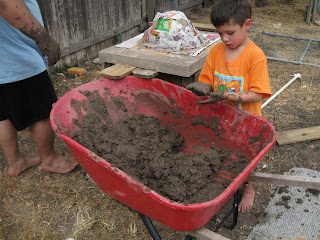
We're mixing up the soil for the first layer of the oven. This is a mix of clay, sand, and water. The clay we got from our own yard. The sand we purchased from the home improvement store. Everyone had muddy feet after this!
 We're adding the first layer of the earth oven. It goes on four inches thick around the sand dome. The sand dome was covered with newspaper to prevent the clay from sticking to it.
All done! Doesn't it look beautiful?

A few cracks started to form a couple hours later. We just filled them in with more building soil.
 After about 4 hours, we went back and cut out the door. Then we started firing up the oven - this is more to help it dry out than to cook anything. The oven won't perform at it's best until it is totally dry. Since it's been raining (yea!) it's really moist out (it started raining after we lit the fire - hence the tarp).
 You can see at the top of the door, and at the very top of the oven where the clay is getting lighter and is drying.
It will probably take a couple days and a couple more firings until we add the next insulating layer, so stay tuned!


